
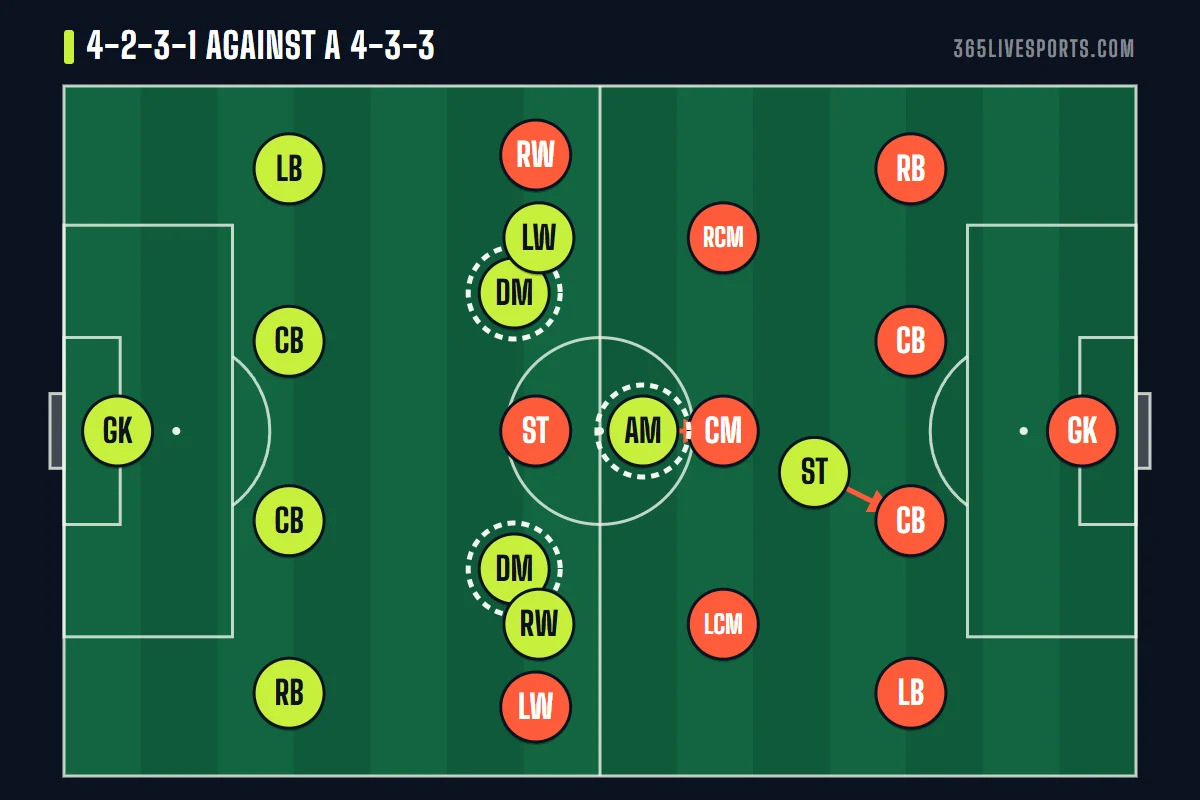
The best formation against 4-3-3 is usually one that matches its three central midfielders and attacks the space behind its full backs, which is why most coaches reach for a 4-2-3-1 or a three-at-the-back shape such as the 3-5-2. There is no magic counter, though. Every shape has places where it has more players than you and places where it has fewer, and beating it means finding the second kind.
This page explains that logic, gives a matchup table for the shapes youth and amateur coaches meet most often, and lists the first change to make when a game is going wrong.
Quick facts
Core idea
Find the zone where you have one more player than the opponent, and get the ball there.Vs 4-3-3
4-2-3-1 to match the midfield, or a back five with two strikers.Vs 4-2-3-1
A 4-3-3 with a holder who sits on the 10.Vs 4-4-2
Any midfield three; 4-3-3 or the diamond.Vs 3-5-2 and 5-3-2
Wingers plus full backs to make 2v1s on the wing backs.First check
Count players in each line before you change anything.
Best formation against 4-3-3: match the middle, attack the flanks
The 4-3-3 is strongest in two places: its three central midfielders, and its front three, which matches up one-on-one against a back four when it presses. It is weakest beside its single holding midfielder and behind its full backs, who push on to support the wingers.
- 4-2-3-1. The most common answer. Your two holding players pick up their two eights, and your 10 stands on their six so he cannot receive. Their front three now faces your back four plus two screens.
- A mirror 4-3-3 with a stronger six. If your players know the shape, matching it makes every duel 1v1. The team with the better holding midfielder usually wins.
- 3-5-2 or 5-3-2. Five defenders face their front three, with the wing backs tracking the wingers, and your strike pair keeps both their center backs busy on the break. It suits a weaker side that wants to stay compact.
Whatever you choose, aim the counterattack at the space behind the full back on the side where their winger is the least hard-working.
The logic of overloads
Choosing a counter formation is mostly arithmetic. Put both shapes on a pitch, line by line, and count. Coaches look for three things:
- A spare defender. You want one more defender than they have strikers: three against two, or two center backs plus a holder against one. That spare player can step out or cover without leaving anyone free.
- A midfield majority. Three against two in the center means one of your midfielders is always open. That free player is who you look for when building attacks.
- A wide 2v1. Two of yours on one of theirs out wide, usually winger and overlapping full back against a lone wing back or wide midfielder, breaks most blocks.
You cannot win every zone with 10 outfield players, so pick the two that matter most against this opponent and accept a fair fight elsewhere. A team that builds through the middle should be met with numbers in the middle; a team that crosses a lot should be met with numbers wide and in the box.
Matchup table: counter formations for the common shapes
| Opponent | Strong in | Open in | Shapes to try | First adjustment |
|---|---|---|---|---|
| 4-3-3 | Central three, high press | Beside the six, behind full backs | 4-2-3-1 above all; else a mirror image, or a deep back five | Put a player on their six |
| 4-2-3-1 | The 10 between the lines, double pivot cover | Lone striker, wide midfielders who do not track | A holder-led 4-3-3; also the narrow diamond | Mark the 10 tightly |
| 4-4-2 | Width, two banks, two strikers | Central midfield, space between the lines | Anything with a midfield three: front-three shapes, diamonds, back threes | Play someone between their lines |
| 3-5-2 | Central midfield, spare center back | Flanks, behind the wing backs | 4-3-3 first; 3-4-3 also works | Two players on each wing back |
| 5-3-2 | Penalty area, counterattacks | Midfield width, in front of the back five | 4-3-1-2 first; plan B is 4-2-3-1 | Shoot from the edge, switch play fast |
| 3-4-3 | Front three, width | Central midfield pair | A midfield three; 3-5-2 suits best | Three in central midfield |
| 4-2-4 | Numbers in attack | Midfield, only two players there | Anything that keeps the ball; 4-3-3 is ideal | Keep the ball and pass through the middle |
Best formation against 4-2-3-1
The 4-2-3-1 lives through its number 10. Take him away and the shape splits into a defensive six and an isolated front four. The cleanest way is a 4-3-3 whose holding midfielder sits on the 10, while your two eights press the double pivot. A narrow diamond (4-1-2-1-2) does the same job and adds a second striker to pin both center backs.
Once the whistle goes: attack the full back on the side where their wide midfielder stays high, and press the pivots from behind as soon as they receive facing their own goal. If their striker is isolated, keep one center back tight on him and let the other step into midfield.
4-4-2 counter formation: what to use against two banks of four
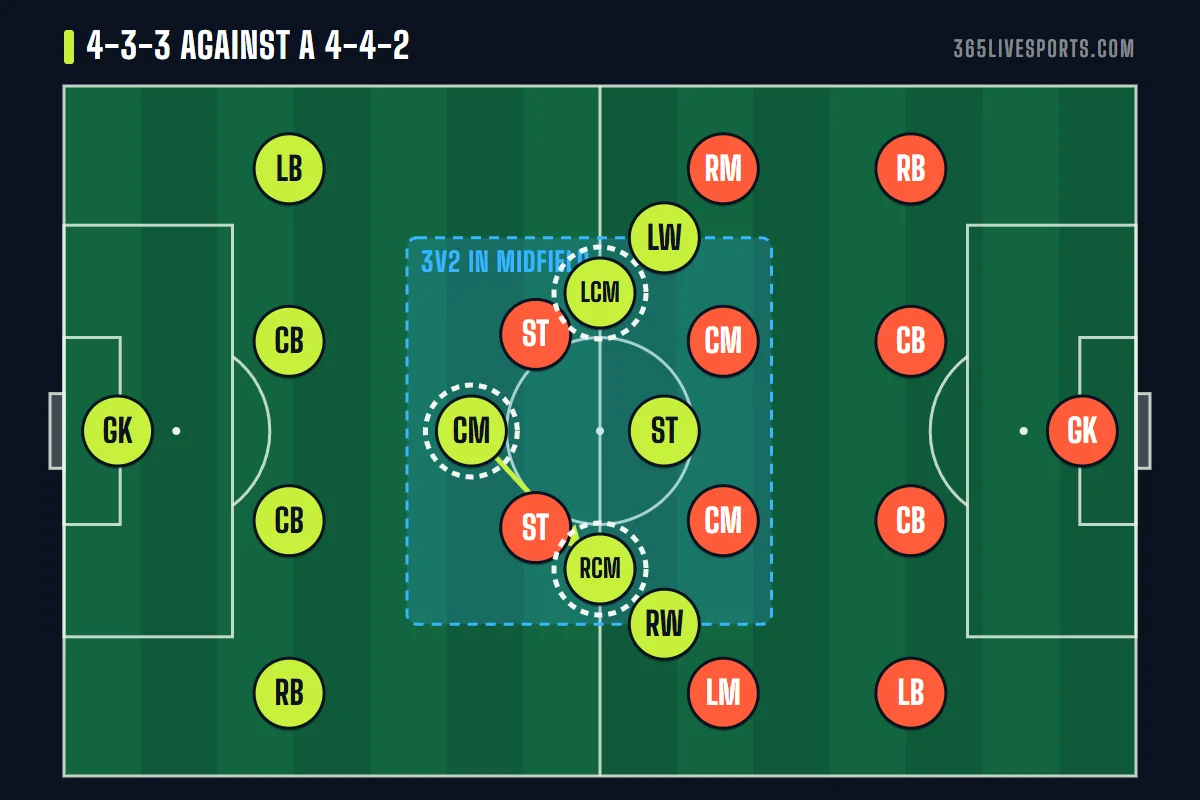
Against a 4-4-2, any shape with three central midfielders gives you the free player. Most coaches go with a 4-3-3 here. A diamond also works, with its 10 standing in the hole between the two banks so their central midfielders never know whether to step up. With a 3-5-2 you get three center backs for their two strikers, letting you build from the back at your own pace.
Watch out for their wide midfielders and full backs doubling up on your flanks, especially if you play a narrow shape. Your full backs need help from an eight or a dropping striker when the ball goes wide.
Beating back threes, and the best formation against 5-3-2
Back threes and back fives hate two things: wingers who pin the wing backs, and switches of play that make the wing backs run. A 4-3-3 does both. Its front three occupies all three center backs, so none can step out, and each winger plus full back makes a 2v1 against a wing back.
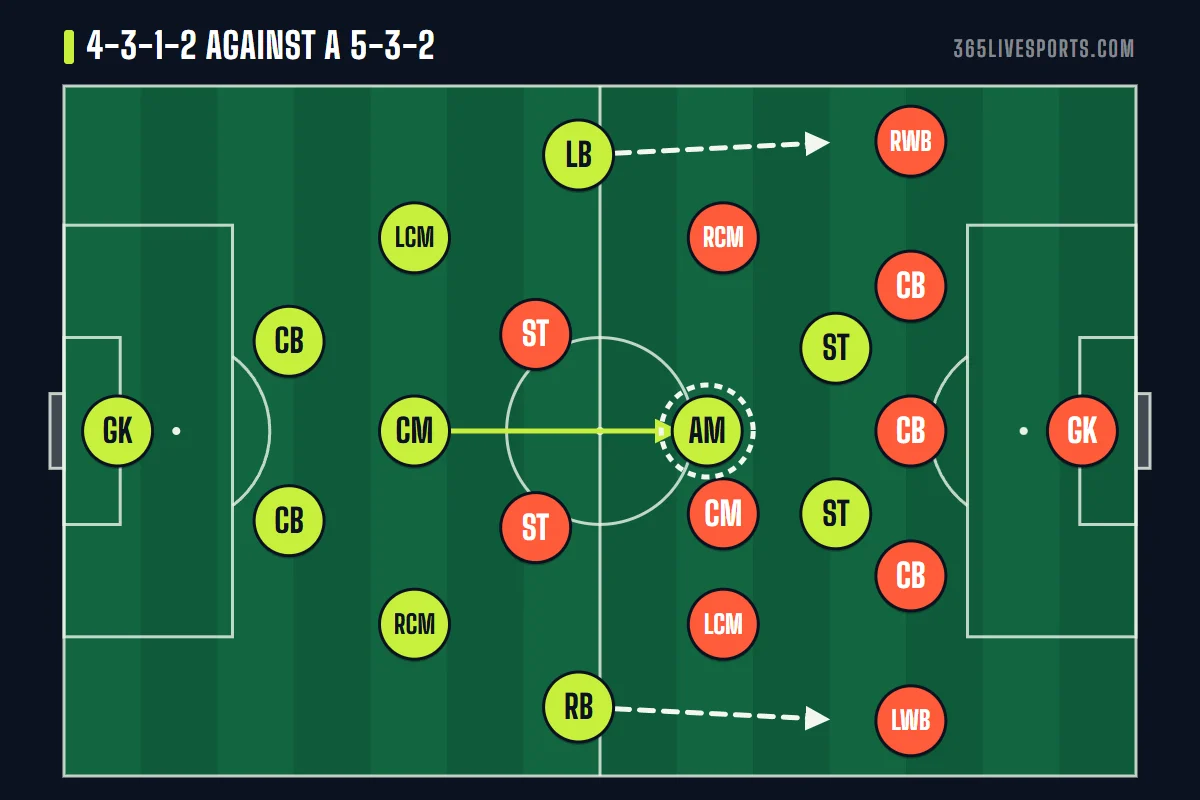
Against a deep 5-3-2, a counter formation using 4-3-1-2 is a smart choice. The 10 sits in front of the back five where the midfield three cannot reach him, the two strikers pin the center backs, and the full backs push high against the wing backs. Long-range shots and early crosses before the five is set are your main weapons. See the 4-3-1-2 page for the roles.
Against 3-4-3, 3-4-2-1, plus the old 4-2-4
Both the 3-4-3 and its cousin with two tens, the 3-4-2-1, have only two central midfielders. Adding a third central midfielder (with a back three or a back four) gets you the extra body; the challenge is the two players between your lines (the 3-4-2-1's attacking midfielders). Ask your holder to stay deep and your full backs to squeeze inside when the ball is central.
The best formation against 4-2-4 is any shape that keeps the ball through midfield, because the 4-2-4 has just two players there. Shapes with three or four midfielders will outnumber that pair. Keep possession, make them run, and attack the space their four forwards leave behind.
Changing shape during a game
- Count first. In the first ten minutes, count the players in each of their lines, once when they have the ball and once when they do not. The team sheet often lies.
- Find the free player. Who on their team keeps receiving unmarked? That is the problem to fix first.
- Make the smallest change. Moving one player (a striker dropping onto their six, a winger tucking in) is easier than changing the whole formation.
- Explain it with a picture. At a break, show the change on the tactics board rather than describing it.
- Check again five minutes later. The opponent's coach is making changes too.
Questions players and coaches ask
What is the best formation against 4-3-3?
A 4-2-3-1 is the most common answer because its 10 can mark the holding midfielder and its two pivots match the two eights. Teams that prefer to defend deep can use a back five and counter with two strikers.
What is the best formation against 4-2-3-1?
A holder-led 4-3-3, where the six marks the 10, is the usual choice. A diamond 4-1-2-1-2 also works, adding a second striker to occupy both center backs.
What is the best formation against 4-4-2?
Any shape with three central midfielders, a 4-3-3, for example, or the diamond, because it creates a 3v2 in the middle. Three center backs in a 3-5-2 leave one spare against two strikers.
How do you beat a 3-5-2 formation?
Send two attackers at each wing back (a winger and the full back behind him), and play three forwards so none of the center backs can step out. Fast switches force the wing backs to cover the full width.
What is the best formation against 5-3-2?
Shapes that park a playmaker in front of the back five (the 4-3-1-2 above all) work well, because the midfield three cannot cover that space and the width at the same time. Full backs pushing high give the extra width.
How do you beat a 3-4-3 formation?
Overload its two central midfielders with a midfield three, and keep a spare defender against its front three. Back-three teams can use the 3-5-2; back-four teams can choose a front-three shape anchored by a deep holder.